How to Master Gingival Retraction for Better Results
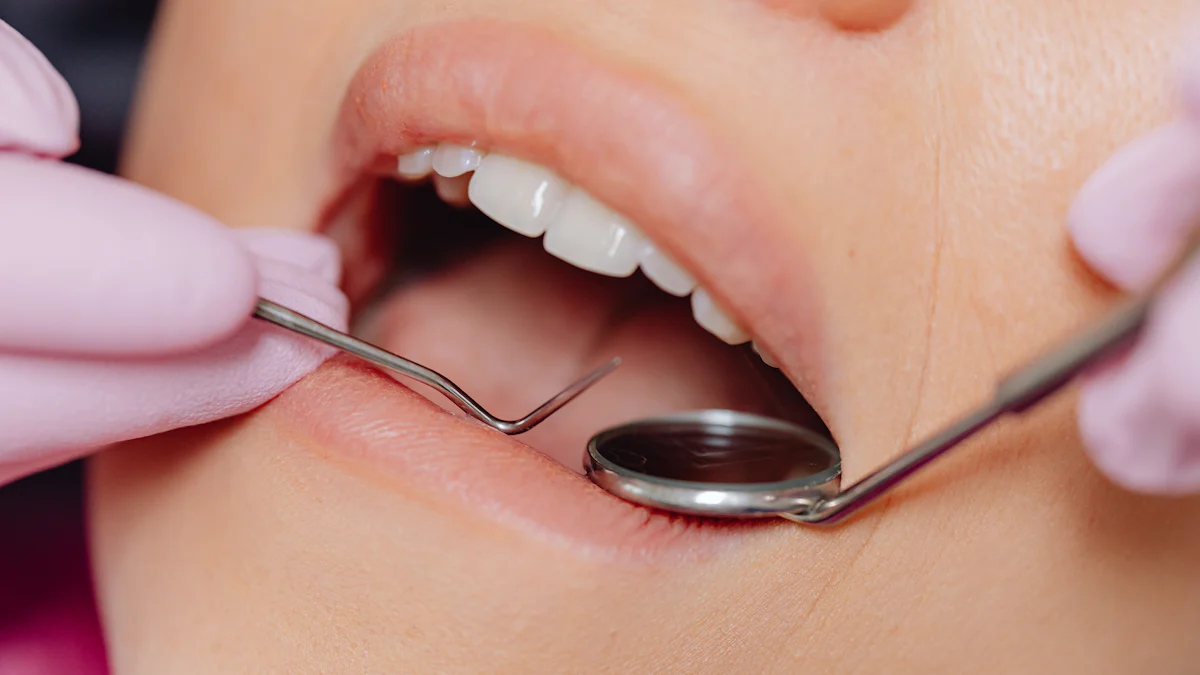
Gingival retraction plays a vital role in dentistry. It temporarily displaces the gum tissue, providing better access to the tooth surface and the sulcus. This technique ensures accurate impressions for crowns, restorations, and other dental procedures. By mastering gingival retraction, you can improve visibility, reduce the risk of tissue damage, and achieve precise results. Proper methods, such as using a retraction cord or chemical agents, help create a clear working area. This process not only enhances procedural outcomes but also prioritizes patient comfort and safety.
Importance of Gingival Retraction
Gingival retraction is essential for achieving precision and efficiency in dental procedures. It temporarily displaces the gum tissue, allowing you to work with greater accuracy and control. By mastering this technique, you can improve visibility, enhance procedural outcomes, and protect the surrounding tissues from unnecessary trauma.
Enhancing Visibility and Access
Gingival retraction improves your ability to see and access critical areas of the tooth and gum. This is especially important when working on restorations, crowns, or impressions.
It exposes the tooth margins, making it easier to identify and work on them.
You can shape and finish restorations with greater precision.
Combining retraction cords with dental burs ensures high-quality results.
For example, when preparing a tooth for a crown, retraction creates a clear view of the sulcus and marginal areas. This clarity allows you to record accurate impressions and avoid errors during cementation. Using tools like braided or knitted retraction cords can help you achieve this level of precision.
Improving Accuracy in Dental Procedures
Accurate impressions and restorations depend on proper gingival retraction. By creating a clean and dry working area, you can ensure that your work aligns perfectly with the patient’s natural anatomy.
When you use a retraction cord, it deflects the gingiva laterally, providing the space needed to capture detailed impressions. This step is crucial for procedures like crown placement or veneer preparation. Without proper retraction, saliva or enlarged gums can interfere with the process, leading to inaccurate results.
Additionally, using impregnated retraction cords with hemostatic agents like aluminum chloride helps control bleeding and moisture. This ensures that the impression material records the tooth surface accurately, reducing the need for adjustments later.
Preventing Damage to Surrounding Tissues
Protecting the gum tissue during gingival retraction is just as important as achieving precision. Improper techniques can lead to tissue damage, recession, or inflammation.
To minimize risks, you can use advanced methods like diode lasers or injectable matrices. Diode lasers allow you to perform gingivectomy with minimal trauma, making the process relatively painless for the patient. Injectable matrices reduce the chance of lacerations and protect the junctional epithelium from chemical exposure.
Other options, such as gingival displacement foams and gels, make cord placement easier while controlling bleeding. These materials create a safer environment for both you and the patient, ensuring that the surrounding tissues remain intact.
By prioritizing gentle techniques and using the right tools, you can prevent complications and deliver better outcomes.
Types of Gingival Retraction Cords
Choosing the right gingival retraction cord is essential for achieving accurate impressions and protecting the surrounding tissues. Each type of cord offers unique characteristics, making it suitable for specific clinical situations. Understanding these differences helps you select the most effective option for your procedure.
Braided Cords
Braided cords are tightly woven, providing firmness and structure. These cords work well in cases where significant gingival displacement is required. Their rigidity allows you to pack them into the sulcus with precision, ensuring proper deflection of the gingiva.
You can use braided cords for procedures like crown preparation or veneer placement, where exposing the tooth margin is critical. These cords maintain their shape during placement, making them a reliable choice for achieving consistent results. However, their firmness may not be ideal for patients with sensitive gums or inflamed tissues.
Knitted Cords
Knitted cords are softer and more flexible than braided cords. They expand slightly when exposed to moisture, such as saliva or water, which enhances their ability to provide gentle retraction. This feature makes knitted cords an excellent choice for patients with delicate or inflamed gingival tissues.
These cords are easy to manipulate and conform to the contours of the sulcus. You can use them for procedures requiring moderate retraction, such as minor restorations or impressions. Their ability to absorb hemostatic agents also helps control bleeding and moisture, ensuring a clean working area.
Twisted Cords
Twisted cords consist of individual fibers twisted together, creating a flexible and easy-to-handle option. These cords are ideal for cases requiring minimal gingival displacement. Their pliability allows you to adapt them to the sulcus without causing unnecessary pressure on the tissues.
Twisted cords are commonly used for less invasive procedures or when working with patients who have tight or narrow sulci. While they may not provide the same level of retraction as braided or knitted cords, their gentle nature makes them a valuable tool in your clinical practice.
Type of Cord | Characteristics |
|---|---|
Braided Cords | Offer firmness and structure, ideal for cases requiring significant retraction. |
Knitted Cords | Expand slightly when wet, providing a gentler retraction suitable for sensitive tissues. |
Twisted Cords | Flexible and easy to manipulate, perfect for minor retraction needs. |
By understanding the unique properties of braided, knitted, and twisted cords, you can select the most appropriate option for each procedure. This ensures better outcomes and enhances patient comfort during gingival retraction.
Impregnated vs. Non-impregnated Cords
Selecting between impregnated and non-impregnated gingival retraction cords depends on the clinical situation and patient needs. Each type offers unique benefits and limitations, making it essential to understand their properties before deciding which to use.
Impregnated retraction cords are pre-treated with chemical agents like aluminum chloride or epinephrine. These chemicals enhance the cord's ability to control bleeding and manage moisture during procedures. Aluminum chloride-impregnated cords are widely used due to their effective hemostatic properties and safety for most patients. Epinephrine-impregnated cords, on the other hand, provide excellent bleeding control but require caution when treating patients with cardiovascular conditions.
These cords offer dual benefits. They combine mechanical retraction with chemical action, creating better sulcus displacement. This ensures a clean and dry working area, which is crucial for recording accurate impressions or preparing a tooth for a crown. When used for less than 10 minutes, impregnated cords minimize tissue damage, making them a reliable choice for many dental procedures.
Non-impregnated retraction cords, in contrast, do not contain any chemical agents. These cords rely solely on mechanical displacement to retract the gingiva. They are simpler to use and may be less traumatic for patients with sensitive gums or allergies to certain chemicals. Dentists often pair non-impregnated cords with astringent solutions or hemostatic agents applied separately. This allows you to customize the treatment based on the specific needs of the procedure.
Tip: If you are working on a patient with inflamed or enlarged gums, consider using a non-impregnated cord with a hemostatic paste. This combination provides effective retraction while reducing the risk of irritation.
Cord Type | Advantages | Disadvantages |
|---|---|---|
Impregnated Cords | Control bleeding and moisture; provide better sulcus displacement; minimal tissue damage. | May not be suitable for patients with chemical sensitivities or cardiovascular issues. |
Non-impregnated Cords | Simpler and less traumatic; customizable with separate hemostatic agents. | Require additional materials to achieve hemostasis and moisture control. |
When choosing between these options, consider the patient's medical history, the procedure's complexity, and the desired outcome. Impregnated cords are commonly used for procedures requiring precise impressions, such as crown or veneer preparation. Non-impregnated cords work well for less invasive treatments or when you need to avoid chemical exposure.
By understanding the differences between impregnated and non-impregnated cords, you can select the most appropriate method for each clinical situation. This ensures better procedural outcomes and enhances patient comfort.
Step-by-Step Guide to Using Gingival Retraction Cords
Mastering the use of gingival retraction cords involves understanding each step of the process. From preparation to removal, every stage plays a crucial role in achieving accurate impressions and protecting the surrounding tissues. This guide outlines the essential techniques to help you perform this procedure effectively.
Preparation
Proper preparation ensures the success of gingival retraction. It involves selecting the right cord and creating an optimal work environment.
Selecting the Right Cord
Choosing the correct gingival retraction cord depends on the clinical situation and the patient’s needs. Evaluate the health of the gingiva and the depth of the sulcus. For shallow sulci, use a thin cord and a single-cord technique. Deeper sulci may require a double-cord technique, where a thin cord is placed first, followed by a wider one.
Consider the type of procedure and the patient’s medical history. For example, braided cords provide firm retraction for crown preparations, while knitted cords are gentler and suitable for inflamed gums. Impregnated cords with aluminum chloride help control bleeding, but avoid them for patients with chemical sensitivities.
Preparing the Work Area
A clean and dry work area is essential for effective gingival retraction. Begin by isolating the tooth with cotton rolls or a rubber dam. Use astringent solutions to manage bleeding and saliva. Twist the cord tightly before placement to ensure it fits snugly into the sulcus. Some clinicians prefer placing the cord before finishing the tooth preparation to maintain tissue deflection throughout the procedure.
Placement
Accurate placement of the gingival retraction cord ensures proper deflection of the gingiva and creates space for impressions.
Techniques for Proper Insertion
Use a packing instrument to gently insert the cord into the sulcus. Start at one end of the tooth and work around it in small increments. Avoid excessive force to prevent tissue damage. For deeper sulci, the double-cord technique provides better displacement. Place the first cord below the margin and the second cord above it. Leave the cords in place for three to five minutes to achieve optimal retraction.
Knitted cords expand when wet, enhancing their ability to open the sulcus. This makes them ideal for procedures requiring greater access. Braided cords maintain their shape during placement, ensuring consistent results.
Managing Bleeding and Moisture
Control bleeding and moisture to maintain a clear working area. Impregnated cords with hemostatic agents like aluminum chloride are effective for this purpose. Wet the cord with water before removal to prevent tissue trauma. If bleeding persists, apply additional hemostatic paste or use a diode laser for precise tissue management.
Removal
Proper removal of the gingival retraction cord is just as important as its placement.
Timing the Removal Correctly
Remove the cord immediately before taking the impression. This timing ensures the gum tissue remains retracted, providing a clear view of the margins. Delaying removal may cause the tissue to rebound, compromising the accuracy of the impression.
Ensuring No Residue is Left Behind
Check the sulcus carefully after removing the cord to ensure no residue remains. Residual fibers can interfere with the impression material and affect the final restoration. Use a gentle rinsing technique to clear the area and inspect it thoroughly before proceeding.
By following these steps, you can master the use of gingival retraction cords. This process not only improves procedural outcomes but also enhances patient comfort and safety.
Common Mistakes and How to Avoid Them
Even experienced dental professionals can make mistakes when using gingival retraction cords. These errors can compromise the accuracy of impressions, damage the gingival tissue, or cause patient discomfort. By understanding these common pitfalls, you can refine your technique and achieve better results.
Using the Wrong Type of Cord
Selecting the wrong gingival retraction cord can lead to inadequate retraction or harm to the gums. For example, using a cord that is too thick for a shallow sulcus may cause excessive pressure, resulting in tissue trauma or discomfort for the patient. On the other hand, a cord that is too thin may fail to provide sufficient displacement, leading to poor margin detail in the impression.
Tip: Always evaluate the clinical situation before choosing a cord. Consider factors like sulcus depth, tissue health, and the type of procedure. For sensitive gums, opt for a knitted retraction cord, which provides gentle retraction. For deeper sulci, a braided cord offers the firmness needed for effective displacement.
Using impregnated cords without assessing the patient’s medical history can also pose risks. For instance, epinephrine-impregnated cords may control bleeding effectively but can cause complications in patients with cardiovascular conditions.
Improper Placement Techniques
Incorrect placement of the retraction cord can damage the sulcular epithelium and connective tissue. Applying excessive force during packing may lead to trauma, inflammation, or even tissue necrosis. Residual filaments left in the sulcus can exacerbate inflammation and delay healing.
Risk | Description |
|---|---|
Forceful placement can damage the epithelium and connective tissue. | |
Inflammation | Residual fibers in the sulcus can cause irritation and swelling. |
Bleeding | Improper techniques often result in bleeding upon cord removal. |
Excessive pressure can lead to necrosis and delayed healing of the gingival tissue. |
To avoid these issues, use a packing instrument with a rounded tip and work in small increments. Start at one end of the tooth and gently guide the cord into the sulcus. Avoid pushing the cord too deeply, as this can cause ulcerations or permanent gingival recession.
Note: Wet the cord slightly before removal to minimize trauma and bleeding. This simple step can make a significant difference in patient comfort and tissue health.
Leaving the Cord in Too Long
Leaving the gingival retraction cord in place for an extended period can harm the gingiva. Prolonged contact may cause temporary swelling, inflammation, or even tissue necrosis. Additionally, the gum tissue may rebound after the cord is removed, compromising the accuracy of the impression.
Alert: Never leave the cord in for more than 10 minutes. Monitor the time carefully to ensure the tissue remains healthy and the sulcus stays open for accurate impressions.
To prevent complications, remove the cord immediately before taking the impression. Check the sulcus thoroughly to ensure no fibers remain. Residual material can interfere with the impression and affect the final restoration.
By avoiding these common mistakes, you can improve the effectiveness of gingival retraction and enhance patient outcomes. Proper cord selection, gentle placement, and timely removal are key to mastering this essential dental technique.
Neglecting Patient Feedback
Ignoring patient feedback during gingival retraction can lead to discomfort, procedural errors, and even long-term complications. Patients often provide valuable insights about their experience, which can help you refine your technique and ensure better outcomes. Listening to their concerns is not just about improving comfort; it also enhances the accuracy of your work and builds trust.
Why Patient Feedback Matters
Patients can feel sensations or discomfort that you may not notice during the procedure. For example, excessive pressure while packing a retraction cord can cause pain or irritation to the gingiva. If a patient expresses discomfort, it might indicate that the cord is too thick, improperly placed, or causing unnecessary trauma to the gum tissue.
Tip: Always ask your patient how they feel during the procedure. A simple question like, "Are you feeling any discomfort?" can provide critical information.
Feedback also helps you identify potential issues with the materials or methods you use. For instance, some patients may react to impregnated retraction cords containing epinephrine or aluminum chloride. These reactions can include increased sensitivity, swelling, or even allergic responses. By paying attention to their feedback, you can adjust your approach and choose alternative materials, such as non-impregnated cords or astringent solutions.
Consequences of Ignoring Feedback
Neglecting patient feedback can lead to several complications:
Tissue Damage: Ignoring signs of discomfort may result in gingival recession or lacerations.
Inaccurate Impressions: If the patient moves due to pain, the retraction cord may shift, compromising the sulcus deflection and the accuracy of the impression.
Loss of Trust: Patients who feel unheard are less likely to return for future treatments or recommend your services.
Alert: Never dismiss a patient's concerns as minor. Even slight discomfort can indicate a problem that requires immediate attention.
How to Incorporate Feedback
You can create a more patient-centered approach by actively seeking and acting on feedback.
Communicate Clearly: Explain each step of the gingival retraction process before starting. Let the patient know what to expect, especially if you plan to use methods like braided cords or chemical agents.
Observe Non-Verbal Cues: Watch for signs of discomfort, such as facial expressions or body movements. These cues can reveal issues the patient may hesitate to verbalize.
Adjust Techniques: If a patient reports pain, switch to a gentler method. For example, use a knitted retraction cord instead of a braided one for sensitive gums.
Follow Up: After the procedure, ask the patient about their experience. This feedback can help you improve your technique for future cases.
By prioritizing patient feedback, you can enhance the effectiveness of gingival retraction while ensuring a positive experience for your patients. This approach not only improves procedural outcomes but also strengthens your reputation as a caring and skilled dental professional.
Tips for Patient Comfort and Safety
Ensuring patient comfort and safety during gingival retraction is essential for successful outcomes. By focusing on clear communication, effective pain management, and attentive monitoring, you can create a positive experience for your patients while achieving accurate results.
Communicating with the Patient
Clear communication helps patients feel at ease and builds trust. Before starting the procedure, explain the purpose of gingival retraction and how it benefits the treatment. Use simple language to describe the process, such as how the retraction cord temporarily displaces the gum tissue to improve access and visibility.
Tip: Let your patient know what sensations to expect, like slight pressure or mild discomfort. This prepares them mentally and reduces anxiety.
Encourage your patient to share any concerns or questions. For example, if they feel nervous about the packing of the retraction cord, reassure them by explaining that you will use gentle techniques to protect their gums. Open communication fosters a collaborative environment, making the procedure smoother for both you and the patient.
Using Anesthetics or Topical Agents
Pain management plays a crucial role in patient comfort. Topical anesthetics or local agents can significantly reduce discomfort during gingival retraction.
Lidocaine gel 9.6%: Apply this gel for one minute to minimize pain during mucosal puncture or anesthetic injection.
Lidocaine spray: This option provides quick relief and is easy to apply.
Benzocaine gel: Equally effective as lidocaine spray, it helps control pain during local anesthesia administration.
Choose the most suitable anesthetic based on the patient’s needs and the clinical situation. For example, benzocaine gel works well for patients with mild sensitivity, while lidocaine gel offers stronger pain relief for more invasive procedures.
Note: Always check for allergies or sensitivities before applying any anesthetic. This ensures the safety of your patient and prevents adverse reactions.
Monitoring for Signs of Discomfort
Pay close attention to your patient’s reactions throughout the procedure. Discomfort can manifest in various ways, such as facial expressions, body movements, or verbal cues.
Alert: If your patient winces or flinches during the packing of the retraction cord, pause immediately and adjust your technique.
Regularly ask your patient how they feel. A simple question like, “Are you okay?” can help you identify issues early. If they report pain, consider switching to a softer cord, such as a knitted retraction cord, or applying additional anesthetic.
Non-verbal cues are equally important. For instance, if your patient clenches their fists or tenses their shoulders, it may indicate discomfort. Address these signs promptly to maintain their trust and cooperation.
By prioritizing communication, using effective anesthetics, and monitoring for discomfort, you can enhance patient comfort and safety during gingival retraction. These steps not only improve the quality of your work but also create a positive experience for your patients.
Ensuring a Gentle Removal Process
Removing a gingival retraction cord requires precision and care. This step is crucial for maintaining the health of the gingiva and ensuring accurate impressions. A gentle removal process minimizes tissue trauma and enhances patient comfort. By following the right techniques, you can achieve optimal results while protecting the gum tissue.
Steps for Safe and Effective Removal
Moisten the Cord Before Removal
Always wet the retraction cord before removing it. Use water or a saline solution to soften the cord. This reduces friction and prevents the cord from pulling on the gingival tissue. A dry cord can stick to the gums, causing unnecessary discomfort or damage.Tip: Use a cotton pellet soaked in water to moisten the cord evenly. This ensures a smooth removal process.
Use the Right Tools
Select a pair of dental tweezers or forceps with a fine tip. These tools allow you to grip the cord securely without applying excessive pressure. Avoid using instruments with sharp edges, as they can harm the gingiva.Remove the Cord in a Controlled Motion
Start at one end of the tooth and gently pull the cord upward and outward. Avoid jerking or pulling too quickly. A slow, steady motion ensures the cord comes out without tearing the tissue. If the cord resists, stop and re-moisten it before trying again.Alert: Never yank the cord out. This can cause lacerations or lead to gingival recession.
Inspect the Sulcus for Residual Fibers
After removing the cord, check the sulcus carefully. Residual fibers can interfere with the impression material and compromise the final restoration. Use a gentle rinsing technique to clear any debris.Note: A thorough inspection ensures no material remains in the sulcus, which could affect the accuracy of the impression.
Common Mistakes to Avoid
Rushing the Process: Hasty removal can damage the gingiva and cause bleeding. Take your time to ensure a smooth and safe procedure.
Skipping the Moistening Step: Removing a dry cord increases the risk of tissue trauma. Always moisten the cord first.
Using Excessive Force: Applying too much pressure can harm the gum tissue and lead to complications like inflammation or recession.
Benefits of a Gentle Removal Process
A careful removal process protects the gingival tissue and ensures accurate impressions. It also enhances patient comfort, reducing anxiety about future procedures. By mastering this step, you can improve the overall quality of your dental work and build trust with your patients.
Reminder: Always prioritize the patient’s well-being during every stage of gingival retraction. A gentle approach reflects your professionalism and commitment to excellent care.
Benefits of Mastering Gingival Retraction
Mastering gingival retraction offers significant advantages for both dental professionals and patients. It enhances procedural accuracy, improves patient experiences, and boosts your confidence as a practitioner. By refining your skills, you can achieve better outcomes and elevate the quality of care you provide.
Improved Procedural Outcomes
When you master gingival retraction, you ensure precise and efficient dental procedures. Proper techniques create a clean and dry working area, allowing you to achieve accurate impressions and long-lasting restorations.
Benefit | Description |
|---|---|
Techniques like CO2 lasers effectively control bleeding during procedures. | |
Reduced tissue shrinkage | Advanced materials minimize gingival tissue shrinkage, preserving gum health. |
Less pain | Proper methods reduce discomfort for patients during and after the procedure. |
Sterilization of the sulcus | Retraction sterilizes the sulcus, lowering the risk of infection. |
Improved quality of impressions | Accurate impressions lead to better-fitting crowns and restorations. |
Longevity of restorations | Precise margins enhance the durability and aesthetics of restorations. |
For example, using a braided retraction cord for crown preparation ensures proper gingival deflection, creating space for accurate margin recording. This precision reduces the need for adjustments during cementation and improves the overall quality of your work.
Enhanced Patient Satisfaction
Patients value comfort and effective results during dental treatments. Mastering gingival retraction helps you meet these expectations by minimizing discomfort and ensuring better outcomes.
You reduce patient discomfort by using gentle techniques and appropriate materials, such as knitted retraction cords for sensitive gums.
Proper retraction methods promote faster healing after procedures, enhancing the recovery experience.
Accurate impressions result in better-fitting crowns, veneers, or other restorations, improving both function and aesthetics.
When patients experience less pain and see high-quality results, they are more likely to trust your expertise and recommend your services. This trust strengthens your professional reputation and fosters long-term patient relationships.
Increased Professional Confidence
Confidence grows when you consistently deliver excellent results. Mastering gingival retraction equips you with the skills to handle complex cases and adapt to various clinical situations.
You gain the ability to select the right tools and techniques for each procedure, whether it involves braided cords for firm retraction or impregnated cords for hemostasis. This expertise allows you to approach each case with precision and assurance.
Additionally, your confidence reflects in your interactions with patients. When you explain procedures clearly and demonstrate competence, patients feel reassured and cooperative. This positive dynamic enhances the overall treatment experience for both you and your patients.
By mastering gingival retraction, you not only improve your technical skills but also elevate your professional standing. This mastery enables you to provide exceptional care and achieve consistently successful outcomes.
Mastering gingival retraction techniques is vital for achieving precision and patient satisfaction in dental procedures. Using methods like retraction cords, gingival paste, or soft-tissue lasers ensures accurate impressions and minimizes tissue trauma. Proper techniques improve visibility, create space for restorations, and enhance procedural outcomes. Avoiding common mistakes, such as improper cord placement or leaving residue, protects the gingiva and ensures long-term success. By prioritizing patient comfort and safety, you can refine your skills and deliver exceptional results. This mastery not only elevates your professional confidence but also fosters trust and satisfaction among your patients.
FAQ
What is gingival retraction, and why is it important?
Gingival retraction temporarily displaces the gum tissue to provide better access to the tooth surface and sulcus. This process ensures accurate impressions, improves visibility, and enhances procedural outcomes for treatments like crowns and restorations.
How do I choose the right gingival retraction cord?
Evaluate the sulcus depth, tissue health, and procedure type. Use braided cords for firm retraction, knitted cords for sensitive gums, and impregnated cords for controlling bleeding. Always consider the patient’s medical history before selecting a cord.
What are the benefits of using impregnated retraction cords?
Impregnated cords, treated with agents like aluminum chloride, control bleeding and moisture. They provide better sulcus displacement and ensure accurate impressions. However, avoid them for patients with chemical sensitivities or cardiovascular conditions.
How long should I leave a gingival retraction cord in place?
Never leave the cord in for more than 10 minutes. Prolonged placement can cause tissue damage or swelling. Remove the cord immediately before taking the impression to maintain accuracy and gum health.
Can gingival retraction cause gum damage?
Improper techniques, such as forceful packing or leaving the cord in too long, can harm the gingiva. Use gentle methods, moisten the cord before removal, and monitor the patient’s feedback to prevent tissue trauma or recession.
What alternatives exist to retraction cords?
Alternatives include gingival paste, diode lasers, and electrosurgery. These methods reduce trauma and provide effective retraction. For example, magic foam gingival retraction paste offers a less invasive option for sensitive gums.
How can I manage bleeding during gingival retraction?
Use impregnated cords with hemostatic agents like aluminum chloride or apply astringent solutions. For persistent bleeding, consider using a diode laser or hemostatic paste to create a clean working area.
How do I ensure patient comfort during gingival retraction?
Communicate clearly, use topical anesthetics like lidocaine gel, and monitor for discomfort. Opt for softer cords, such as knitted retraction cords, for sensitive gums. Always prioritize gentle techniques to enhance the patient’s experience.
See Also
Natural Ways to Improve Gum Health and Reverse Recession
Effective Methods to Prevent Bleeding Gums While Brushing
Guidelines for Managing Gum Issues Throughout Pregnancy